Introduction
This article explains how to attach a receipt to an expense claim when accessing the EASY Expenses system using a web browser, such as Microsoft Edge or Google Chrome. For details of how to make an expense claim involving a receipt using the EASY Companion app you should click here to read the article concerned.
Completing your Expense Claim
When adding an non-mileage related expense claim your employer may require you to provide a receipt to verify the amount being claimed. Depending on how your employer policy the EASY Expenses system may configure be configure differently how the examples given in this article. Even so, the same basic principle applies to attaching a receipt to an expense claim.
Receipt Options
It may be that your employer provides you with different options when it comes to providing a receipt. The following screenshot shows the option to cover the situation where a receipt was not available, as well as giving you the option to attach a receipt.

By clicking on the drop down list you will see the options available, these may include the following
| No Receipt | Where this option is available this will automatically be displayed when the expense type is selected. |
| Forwarded | You would select this option, if available, where you have sent or passed on the receipt to your manager, or the expenses team. |
| Attached | Select this option where you want to attach a receipt. |
Attached Receipt Required
The following screenshot shows the situation where your employer requires the receipt to be attached with your expense claim.

No Receipt Required
Where a type of expense doesn't require a receipt, there won't be any options to select or any icons by the field.

Attaching a Receipt
At this stage, it is assumed that you have either scanned the receipt, taken a photograph using your mobile phone, or you have been issued/sent a file containing the receipt; and that the copy of the receipt is on your computer.
When a receipt is to be attached a number of icons will appear next to the field.
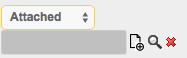
The function of the icons is as follows:
 is used to add a new receipt. When you click on the icon the following screen will appear.
You should click on the Choose File button to select the file or document containing the receipt. If you wish, you can use the Additional Info field to make a comment to remind yourself what the document contains.
 is used to search for a receipt that has been uploaded to EASY previously. By clicking on the icon the screen shown below will be displayed.
Select the file/document that contains the relevant receipt.
 Clicking on this icon will remove the file that has been added or selected in error.
Where a receipt has been attached to more than one claim a warning icon will be displayed on the Expenses Status screen.