Introduction
The Claims screen has two sections covering Mileage Claims and Other Claims. The following looks at these sections in greater detail.
Mileage Claims
This section is designed to enable you to claim your mileage whenever you use a vehicle on official business.
The Mileage Claims section has a blank row to enable you to start entering your claim mileage.

There are several fields and icons that are used in the process and these are explained in more detail below.
| Reason | For certain expense types you may be required to provide a reason for the journey, e.g. Clinical Visit or Trust Meeting. | ||||||||||||
| Extra Detail | For certain Reasons you may be asked to provide extra information. This allows you to enter text to provide more detailed information. Your organisation will provide guidance on what they expect you to put in this field. | ||||||||||||
| Journey Start and End | The journey Start and End fields are controlled by selecting one of the shortcuts from the list that appears when you click the drop down arrow  You can choose from any of the following options :- You can choose from any of the following options :-Base - your designated work base at the claim date will appear in the field underneath. Location - this indicates that you wish to select one of your employer's locations, i.e. a hospital site or clinic. When you select Location the UK Post Code - when you select this option it indicates to the system that you wish to enter a UK post code, and the field underneath the list will become active to allow you to type in the post code. Home - your home post code at the claim date will appear in the field underneath the list box. Odometer Reading - this indicates to the system that you wish to enter the odometer (mileometer) reading for the start and end of your journey. Most Trusts/Organisations would prefer that you enter the actual journey details, and may have set a system option to not display this type of input. Favorite Places - this is a list managed by you of places you visit regularly (see the Favorite places help screen) | ||||||||||||
| Mileage | The Mileage column has two fields; the top field is the official mileage and lower field is the claimed mileage. Official Mileage The Mileage field is the mileage used by your employer to determine whether the number of miles you are claiming is reasonable. The system checks the Journey selected in the Journey Start/End fields to determine how it should calculate the mileage for the journey. Where the Odometer Reading is entered it is simply a case of deducting the start reading from the end reading. For all other journeys, the system will use the start and end post code to determine the distance. The system will obtain mileage using one of the following methods:
The system will fill this field with the official mileage. However, this figure can be changed, should the distance involved be higher or lower than the official mileage. Where the claimed mileage is higher than the official mileage (this might happen, if for example, you were detoured due to roadworks) this new mileage will be checked to see that the excess claimed is within the limits desided by your employer. You may receive a Orange warning that the mileage is high, or if shown a red warning you will not be allowed to save what is on the screen. | ||||||||||||
| No. of Pass | This is the number of other employees or members of an NHS organisation that were passengers in the same vehicle while on NHS business. By entering the number of passengers in this field you are claiming the passenger allowance for that journey. Your employer may require you to enter the name of the passenger in the additional information field. You are not counted as a passenger. | ||||||||||||
| Heavy Equip. | Sometimes you may be required to carry heavy or bulky equipment as part of your duties. When that is the case, click on the box in the field until a tick appears. You will then be paid a heavy equipment allowance. | ||||||||||||
| Icons | At the end of a mileage claim row there are a number of icons that perform the following actions:
|
 icon will appear to indicate that you can search the locations available. By clicking on the
  icon a separate window appears with the list of all your employer's locations.

 icon is used to indicate that you have provided additional information.


Other Claims
The Other Claims section enables you to claim for expenses and charges incurred whilst on official business.
The Other Claims section has a blank row to enable you to start entering your claim for these expenses.

The fields and icons that are used in this process are explained in more detail below.
| Field Name | Description | ||||||||
|---|---|---|---|---|---|---|---|---|---|
| Date Start/End | This is the date or dates on which the expense was incurred. In the case of an overnight stay, for example, you would enter the arrival and departure dates in the start and end date boxes. You can either enter the date in the box or select the date from the calendar that appears when you click on the  icon on the right-hand side of the box. While the date can be entered using different formats, e.g. dd/mm/yy, dd-mm-yy or dd.mm.yy, it will be displayed in an easy to read format, e.g. 01 Jan 2010. icon on the right-hand side of the box. While the date can be entered using different formats, e.g. dd/mm/yy, dd-mm-yy or dd.mm.yy, it will be displayed in an easy to read format, e.g. 01 Jan 2010. | ||||||||
| Expense type | The list of expense types available may vary according to your job. For example, the Telephone Calls expense type may only appear if you provide on-call cover and you are entitled to claim the reimbursement of calls made on their own telephone. | ||||||||
| Reason | For some expenses you may be required to enter a Reason for incurring the expense. If the box is showing as Grey nothing is required, otherwise you need to select from the valid reasons for the expense. (This feature was introduced in Version 8.0) | ||||||||
| Extra Detail | If you are required to complete the Reason for the expense you may also be required to enter a further explanation in this free format text field to explain why you incurred this expense. (This feature was introduced in Version 8.0) | ||||||||
| Ward / Department | This field if enabled will allow staff who work for multiple departments on the same assignments (such as bank staff) to ensure the expense is directed to the correct Ward / Department. | ||||||||
| Amount | This is the figure that you wish to claim for payment. | ||||||||
| Receipt | Often a particular type of expense may only be reimbursed if you provide proof of the expenditure. Where that is the case, you will be required to indicate if you have Forwarded the receipt to your manager or Attached a file containing a photograph or scan of the receipt. When you specify that a receipt is to be attached to this claim a number of icons will appear that enables you to either add a new file or choose the file required.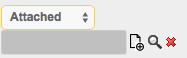
You should click on the Choose File button to select the file or document containing the receipt. If you wish, you can use the Additional Info field to make a comment to remind yourself what the document contains.
Select the file/document that contains the relevant receipt.
| ||||||||
| Icons | At the end of a other claim row there are a number of icons that perform the following actions:
|
 is used to add a new receipt. When you click on the icon the following screen will appear.
 is used to search for a receipt that has been uploaded to EASY previously. By clicking on the icon the screen shown below will be displayed.
 Clicking on this icon will remove the file that has been added or selected in error.

 icon is used to indicate that you have provided additional information in support of this claim.


Entering Expense Claims
As you start to enter claims you will become familiar with what each field, shortcut and icon does.
You will notice that when you select items from lists the full description is not always visible; this is due to the limited space available on the screen. However, when you hover over the field with the mouse pointer the full text of the field appears below the pointer.

You may even encounter new icons, and a few of these are shown in the claims input screen example above.
 | This icon indicates that a warning condition has been triggered, which in this case means that the number of miles claimed is considered to be higher than would be expected, but it is still below the maximum allowable and therefore can be claimed |
 | This indicates that the value claimed exceeds the maximum allowed by the Organisation. Whenever this type of icon appears you must lower the amount claimed before the system will allow you to save the screen. |
 | This indicates that a shuttle bus is available for the journey entered and , normally, mileage can't be claimed for such journeys. The system will automatically set the claimed mileage to zero for shuttle bus routes, although this can be amended where appropriate by the Organisation, for example if you needed to carry heavy equipment |
When you have finished entering all the claim items, you can click on the button at the top right-hand side of the screen to save what you have done so far. This will take you back to the Self Service > Expenses screen.
The button will remove any items that have been entered since the screen was last saved.