Introduction
This area of the system allows you to manage all aspect of your expense claims. From here you can choose to add new expense claims, amend existing claims or view past claims. This page also enables you to monitor your expense claims as they move through the different stages and people involved in the process. The following diagram gives an overview of the expense claim process.
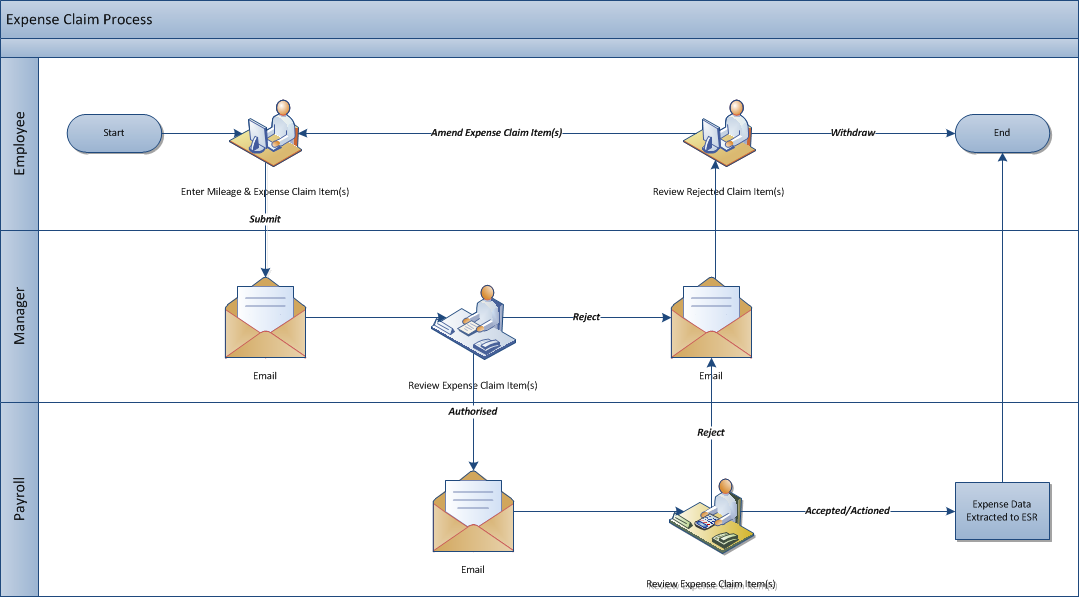
The above process may vary slightly depending on how your Trust/Organisation operates. The EASY system sends emails at each of the key stages to inform the next person in the process that some action is required on their part.
The Expenses Screen
When you select the  from the menu you will be presented with the following screen.

As mentioned earlier this screen enables you to do a number of things, and I would like to go through these in more detail.
Selecting an Assignment
Your name and current assignment (job) will normally appear in the list box at the top of the Self Service Expenses screen. When the list box does not show your name, this normally indicates that you have more than one assignment (job). You will need to click on the list box to select the assignment that you want to access.

Assignment Information
When an assignment has been selected the screen will display different sections. The Assignment Information gives some brief details relating to the assignment. This includes the distance from your Home to Base, which is used by the system when determining the commuter adjustment applicable to certain journeys.

Odometer Reading
For some staff who have a leased vehicle supplied through the Trust/Organisation, they will see the Odometer Reading section.

This gives the last odometer reading provide for the leased vehicle. Where it has been more than a month since the last odometer reading was supplied the following message may appear when the assignment is selected.

To provide an up to date odometer reading, just complete the following fields.
| Field Name | Description |
|---|---|
| Vehicle | Select the leased vehicle from the drop-down list that you want to enter the odometer reading for. |
| Reading | Enter the odometer reading for the vehicle. |
| Date | Enter the date that the odometer reading was taken. You can either enter the date in the field or select the date from the calendar that appears when you click on the  icon on the right-hand side of the field. While the date can be entered using different input formats, e.g. dd/mm/yy, dd-mm-yy or dd.mm.yy, it will be displayed in an easy to read format, e.g. 01 Jan 2010. icon on the right-hand side of the field. While the date can be entered using different input formats, e.g. dd/mm/yy, dd-mm-yy or dd.mm.yy, it will be displayed in an easy to read format, e.g. 01 Jan 2010. |
Click on the button to save the odometer reading.
Claims Sections
The claims sections (image below) show the current progress of any expense claims for the assignment. In the example below, the various sections shows in brackets that there are no expense claims in progress. There may be times when you have number of entries in each section; you can expand and collapse the sections by clicking on the header to look at the entries in that section.

Making Expense Claims
How the claims sections operate will become clearer as you make expense claims. By clicking on the button in the Unsubmitted Claims section you will be taken to the Expense Claim Input screen.
Unsubmitted Claims
Once you have saved the items that you entered on the Claims Input screen you will be returned to the Self Service > Expenses screen. You will need to click on the blue banner of the Unsubmitted Claims section to see the claim items that you saved

The first column has a tick box that is used in conjunction with the three action buttons at the top right-hand side of the Unsubmitted Claims banner. By clicking the tick box in the heading, (indicated by the red arrow) this will select or deselect all claims and the selected rows will be highlighted in yellow. Alternatively, you can select individual claims by clicking on the tick box at the start of the row for the claim concerned; the row will then be highlighted in yellow.
The first four columns have been described in the claims screen, however there are now further columns after the globe icon (if displayed) and these are listed below :
| Est. Net Mileage | This shows the estimated mileage that will be paid for the adjusted mileage claim. Note that this is an estimate only and is no guarantee of the final figure that is paid through ESR. |
| Est. Net Other | This shows the estimated figure that will be paid for other claims. Note that this is an estimate only and is no guarantee of the final figure that is paid through ESR. |
 | Adjustment Details – Clicking on this icon will give details of any adjustment applied to the claim along with the reason. |
| Est. Payment | This provides a calculation of the actual estimated payment you will receive for both mileage and other claims. Note that this is an estimate only and is no guarantee of the final figure that is paid through ESR. |
 | Split Payment Details – Under certain circumstances the mileage payable may be split over different rates, and clicking on the icon will give the details of the split involved. |
 | Passengers – This column displays the number of people who were claimed as passengers for the journey. |
 | Heavy Equipment – A tick in this column indicates when the employee is claiming that heavy equipment was transported on this journey. |
| Receipt | This column is where details of receipts will be displayed. If the receipt is attached it will display the file reference and to view the receipt click the word attached. |
 | Additional Information – This indicates when additional information has been given in support of the claim, and clicking the icon will display the message. |
 | High Value – This indicates where the mileage or amount claimed exceeds the limits set by your organisation. If you hover your mouse pointer over this icon you will be advised of the percentage by which the claim exceeds the "Official Mileage". |
 | Duplicate – This column indicates when a mileage or other type of claim has been claimed more than once for that date. |
 | Receipt Reused – Indicates when the same receipt has been used in other claims. |
 | Absence Overlap – This indicates when the employee was absent on the day that the claim relates to where the Organisation uses either the Easy Time & Attendance system or imports the information. |
 | Shuttle Available – Indicates when a journey between sites has been claimed where a shuttle bus service is available. |
 | Extra Reason Detail - You may see this icon in the "Expense Type / Reason" column. Clicking this icon will show any additional information provided to further explain the reason for the claim |
The Following Paragraph Relates to Pre Version 8 of the Easy Expenses System only
The columns shown in the Unsubmitted Claims section broadly relate to the fields that you saw on the Claims Input screen. You will notice, however, that under the Mileage related columns there is an Adjust column. For some expense types, such as Business Mileage, the mileage claimed may be subject to adjustment because of the terms and conditions involved for that type of claim. Where an expense claim may be liable to adjustment the Adjust column will display ‘T.B.D.’ as the adjustment can only be fully calculated by the EASY system when your manager authorises the claim.
The button takes you to the Claims Input screen where you can add new claims or change any of the previously entered claims selected using the tick box.
The and buttons are also used in conjunction with tick boxes on the left of the claim item row. If you select the button, the claim items marked with a tick will be removed from the claims process altogether. To verify that you are certain that you wish to withdraw the claim items marked, the following message will be displayed.

As a rule you will submit your expense claims to your manager to authorise payment at the beginning of the month; you will be notified of the timetable for submitting expense claims. Having selected the expense claims to be authorised, click on the button. As part of the submission process you are required to verify your claim by completing the Expenses Declaration box shown below. (Note the exact wording is determined by your Organisation and may be different from that shown).
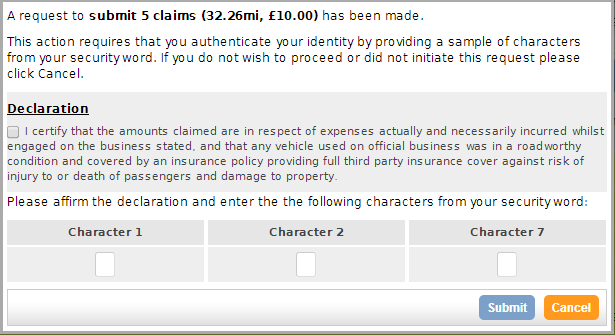
You will need to put a tick in the box that is part of the Declaration by Claimant, and enter the required characters from your security word. When you select the button, an email will be sent to your manager and the submitted claims will now appear in the Submitted Claims section.
Submitted Claims
Often there is a time lag between you submitting your expense claims and your manager processing these claims. During that period you have the opportunity of amending claim items or withdrawing them from the claims process.

To amend claim items, you must put a tick in the box at the left of the claim item row and select the button. This will move the claim item(s) back into the Unsubmitted Claims section using the button to take you to the Claims Input screen.
The Following Paragraph Relates to Pre Version 8 of the Easy Expenses System only
You will notice that the mileage column has changed to "Pred. Adjust.", and the EASY system will has determined the likely adjustment. However, the adjustment won’t be finalised until your manager has authorised the claims; that is because you may add further claims that may affect the adjustment applicable. Next to the adjustment there is an icon. When you click on the icon, an Adjustment Reason box will appear.

This tells you what adjustment rule has been applied, the journey affected and the maximum deduction applicable to that journey. As a row can represent a single leg in a complete journey spanning several rows, the journey affected stated in the Adjustment Reason box may encompass several rows also.
Depending upon the way in which your Trust operates certain expense types may require additional approval by the Payroll/Finance Department after your manager has authorised your expense claim(s). Where this is the case, you may find some claims are still showing in the Submitted Claims section.

The Status column will show that the claim has been "Authorised" and, therefore, is waiting for the Payroll/Finance Department to accept the claim(s). Once accepted the claim will move into "Accepted Claims".
Accepted Claims
Where an expense item does not need to be approved by the Payroll/Finance Department, it will be regarded as being accepted. Once expense claim(s) have been accepted they are moved from the Submitted Claims section to the Accepted Claims section, which ensures that you are aware of the claim's current status.

When you are satisfied that your expense claims have been accepted, you can file them in your expense claim archive. Either click on the tick box in the heading to select all claims, or select individual claims by clicking on the tick box at the start of the row for the claim concerned, and then select the button on the top right-hand side of the Accepted Claims section.

Click on the button to confirm that you want to archive the selected claims. Otherwise, select the button.
Once an expense claim has been accepted it goes into a queue waiting to be extracted in the next payment run.
Rejected Claims
If for some reason your manager or the Payroll/Finance Department have rejected an expense claim, you will receive an email and the rejected claims will appear in the Rejected Claims section.

To view the reason why the claim was rejected you will need to click on the icon shown by the red arrow above on the right of the claim item row.

You can then choose to unsubmit the claim item, which will give you the opportunity of making a change or adding a comment to the claim before resubmitting it. You can also select the option to Edit the claim which will set the claim as unsubmitted and open the edit claim screen for you to make the necessary changes.
Alternatively, you can withdraw (delete) the claim items that are marked with a tick by selecting the button
View Archived Claims
If you need to refer back to an expense claim, you can do so by selecting the button at the top right-hand side of the screen, which will take you to the Self Service > Expenses > Claim History screen.