Table of Contents
- Aim
- Objective
- Background
- Expenses Workflow
- Expenses Status
- Mark Under Review
- Next Assignment
- Expense Claims
- Authorising Expense Claims
- Rejecting Expense Claims
- Accepting Expense Claims
Aim
This article is designed to explain the processes that are available within the EASY system to enable you to manage expense claims of the staff within your area of responsibility.
Objective
After reading this chapter you will be able to:
- Use the Expenses Status page
- Authorise an Expense Claim
- Reject an Expense Claim
- Accept an Expense Claim
Background
The EASY system receives regular downloads of data from the NHS Electronic Staff Record (ESR), and it is this data that provides the background record that enables an employee to quickly complete a claim for the reimbursement of mileage and other expenses.
Expenses Workflow
The process of completing an expense claim is covered by another chapter of the EASY manual. However, you may find that the workflow diagram below provides a useful overview of the Expense processes.
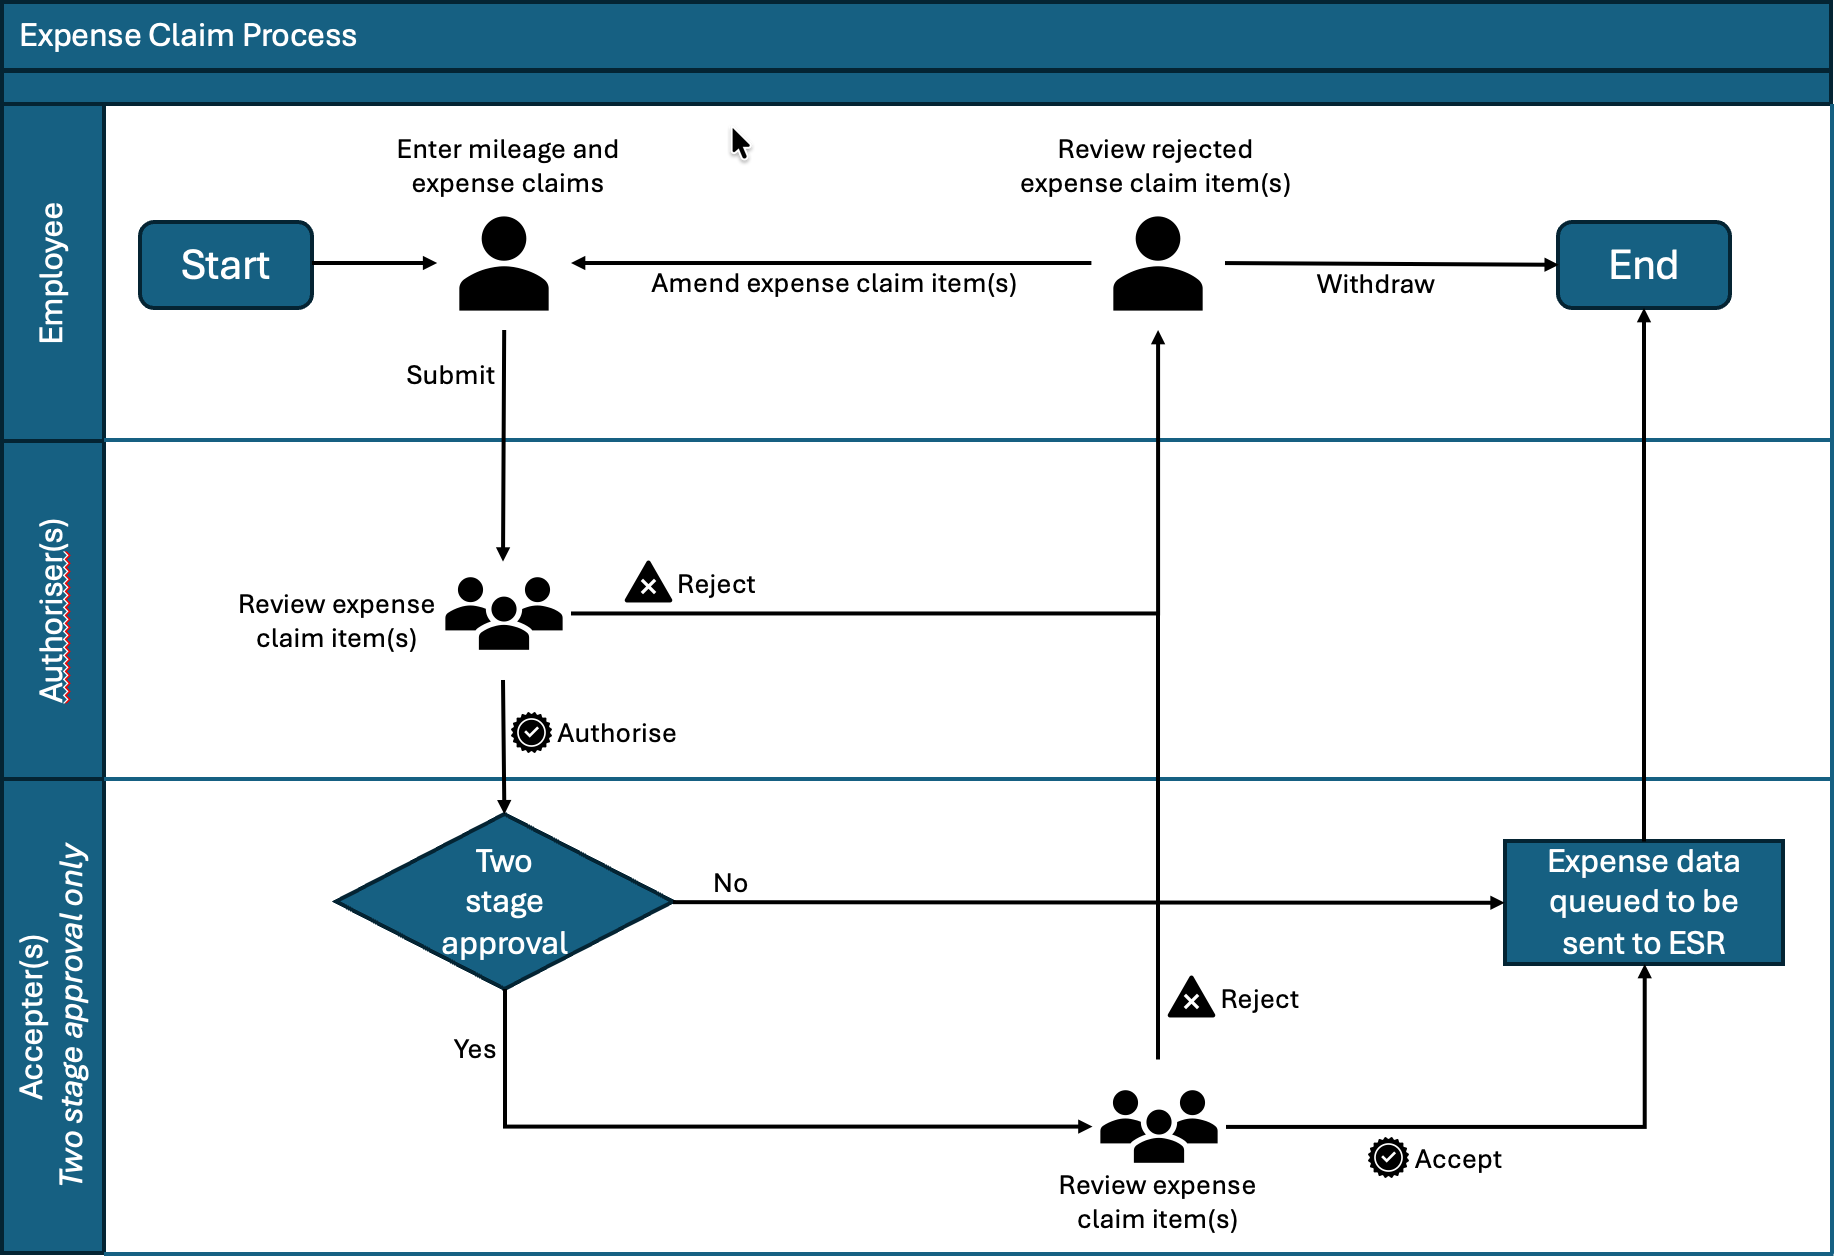
When one of your employees’ submits an expense claim you will receive an email advising that you need to authorise their expense claim. At the same time your Reminders menu will be updated with a message showing the number of expense claims that are waiting to be authorised (see below).
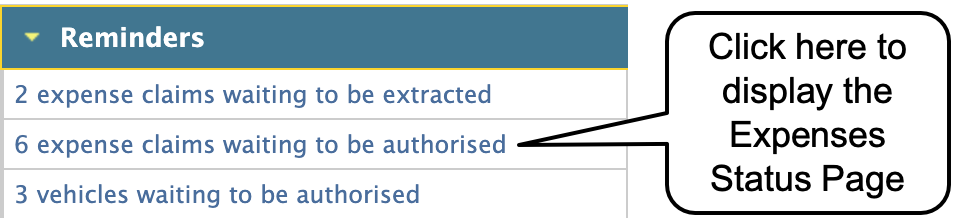
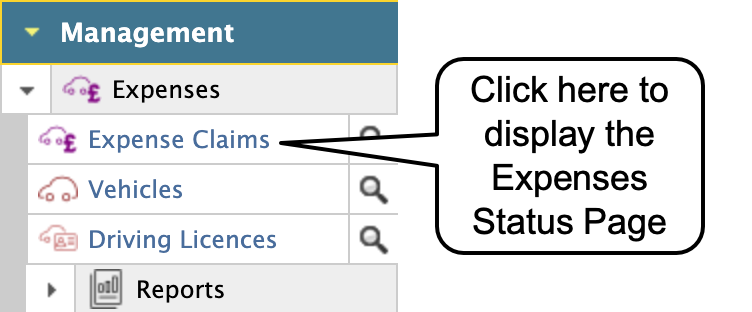
To progress the expense claims you will need to access these through the Expenses Status screen. To display the Expenses Status page, you can either click on the link in the Reminders menu or click on the Expenses link in the Navigation menu.
Expenses Status
The Expenses Status screen (see below) gives you an overview of the expense claims that require your attention. The staff who have submitted an expense claim will appear within the section that relates to their particular pay group.

The entry for each member of staff shows the number of claim items submitted with the total number of miles and/or amount being claimed.
There may be situations where a Trust requires certain expense items to be accepted by another person/team before they are passed for payment. Where that is the case, the person responsible for accepting such claims will see the number of claims that require their attention in the Authorised column.
To view the details of the expense claim, click on the name of the employee whose claim you wish to review.

Mark Under Review
At the top of the claim details page you have the employee information as well as the optional Mark Under Review button. If you want this function to be enabled on your EASY system, your local system administration team will need to raise a request with the Giltbyte helpdesk.

The mark under review button will mark the employee's claims as under review, so when another approver views the employee's claims they will get a warning that the claims are under review.

The warning above the employee information advises who marked the claims as under review and when they did it.
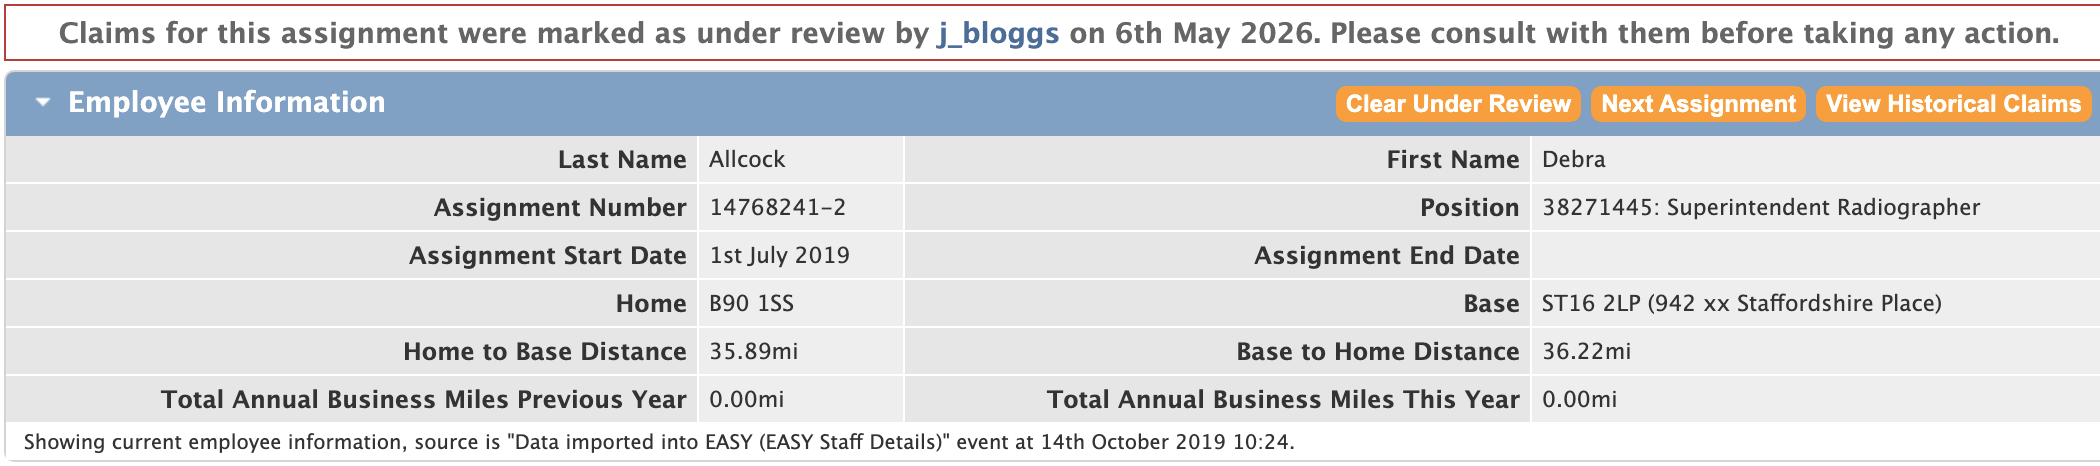
To clear the under review warning click the Clear Under Review button.
Next Assignment
The next assignment button will move to the next employee with claims awaiting approval.

Related to this in the General section of the My Preferences page the approver can choose what the system does after expense claims have been approved.

The options available are as follows, with the first option being the default setting.
| Options | Description |
|---|---|
| Remain on assignment page | The approver will be returned to the assignment claim page. |
| Go to next assignment | The approver will be taken to the next assignment that requires approving. |
| Return to list of assignments | The approver will be taken to the Expenses Status page where the approver can view the assignments that need approving within a team, or find an assignment. |
Expense Claims
The Assignment Claims screen shows the individual claim items that the employee has submitted for authorisation.

While the details shown in the table above are self-explanatory, it may be useful to explain the purpose of the icons that appear in the table. If you are unsure what any of the icons in the column headers represent, you can hover over the icon and it will give you a description of what the icon represents:
The world  icon is used in conjunction with mileage based journeys. By clicking on the world icon on the right-hand side of a journey’s row, a window will appear that shows the calculated mileage and the route that was obtained from HERE Maps for that journey.
An exclamation  icon indicates a warning condition, which means that a validation check has been triggered.
When you hover over the icon with the mouse pointer some text appears below the pointer giving a brief explanation for the warning. In this case, the number of miles claimed by the employee is considered to be higher than would be expected, but it is still below the maximum allowable.
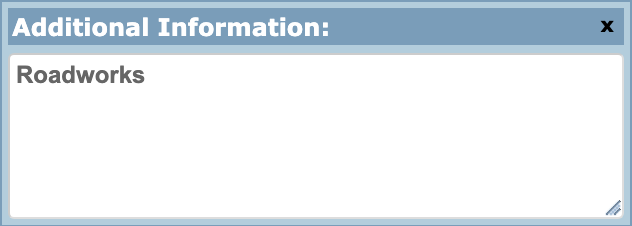
The user comment  icon shows that the employee has provided additional information that they feel is pertinent to that claim item. To view the additional information provided, click on the user comment icon to display Additional Information window (see below).
The history icon shows the status of the claim. By hovering over the icon, or alternatively click the icon to bring up a window, not only can you see the current status of the claim but you will also see the timestamps when the status was changed, and who made the status change. If the claim is awaiting approval it will also show who the approval is waiting with.
The pound icon will show the budget code the claim will be charged to when a budget code has been specified. This could be set on the expense type configuration for the selected expense type or it could be set by the Ward/Department or Project selected when the claim was created. If a budget code has not been specified in any way then a budget code will not be sent with the expense data to ESR.
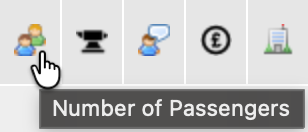
The building icon will show the Ward/Department, Shift Manager, or Project the employee selected for the claim. Hover over or click the icon for details.
The car icon will show when an employee has multiple vehicles in the system with different ownership types, and they make a mileage claim that triggers this condition. An example is if the employee has a private vehicle and a salary sacrifice vehicle, and they make a claim against the private vehicle this would trigger the condition. You can then hover over or click the icon for details of what triggered the condition.
For some expense types the Trust may require the employee to provide a receipt. When completing a claim that requires a receipt, the employee can either indicate that they have forwarded it on to their manager or they can attach a file that contains the receipt. The Receipt column in the table may contain a list box  or a link to the file that is stored in the EASY system. The presence of the list box means that you will need to indicate what action you have taken with the receipt; you may need to refer to the guidance provide by your Trust. To view the file, simply click on the link.
Authorising Expense Claims
To authorise the items claimed by the employee, you must ensure that the tick box at the left-hand side of each row is ticked.
When you enter the screen each of the boxes may be ticked if your Trust has activated that option. You can use the tick box in the table heading to tick all the boxes or untick all the boxes. You can use the tick/untick all option as well as clicking on the relevant box to tick or untick the relevant box for greater flexibility.
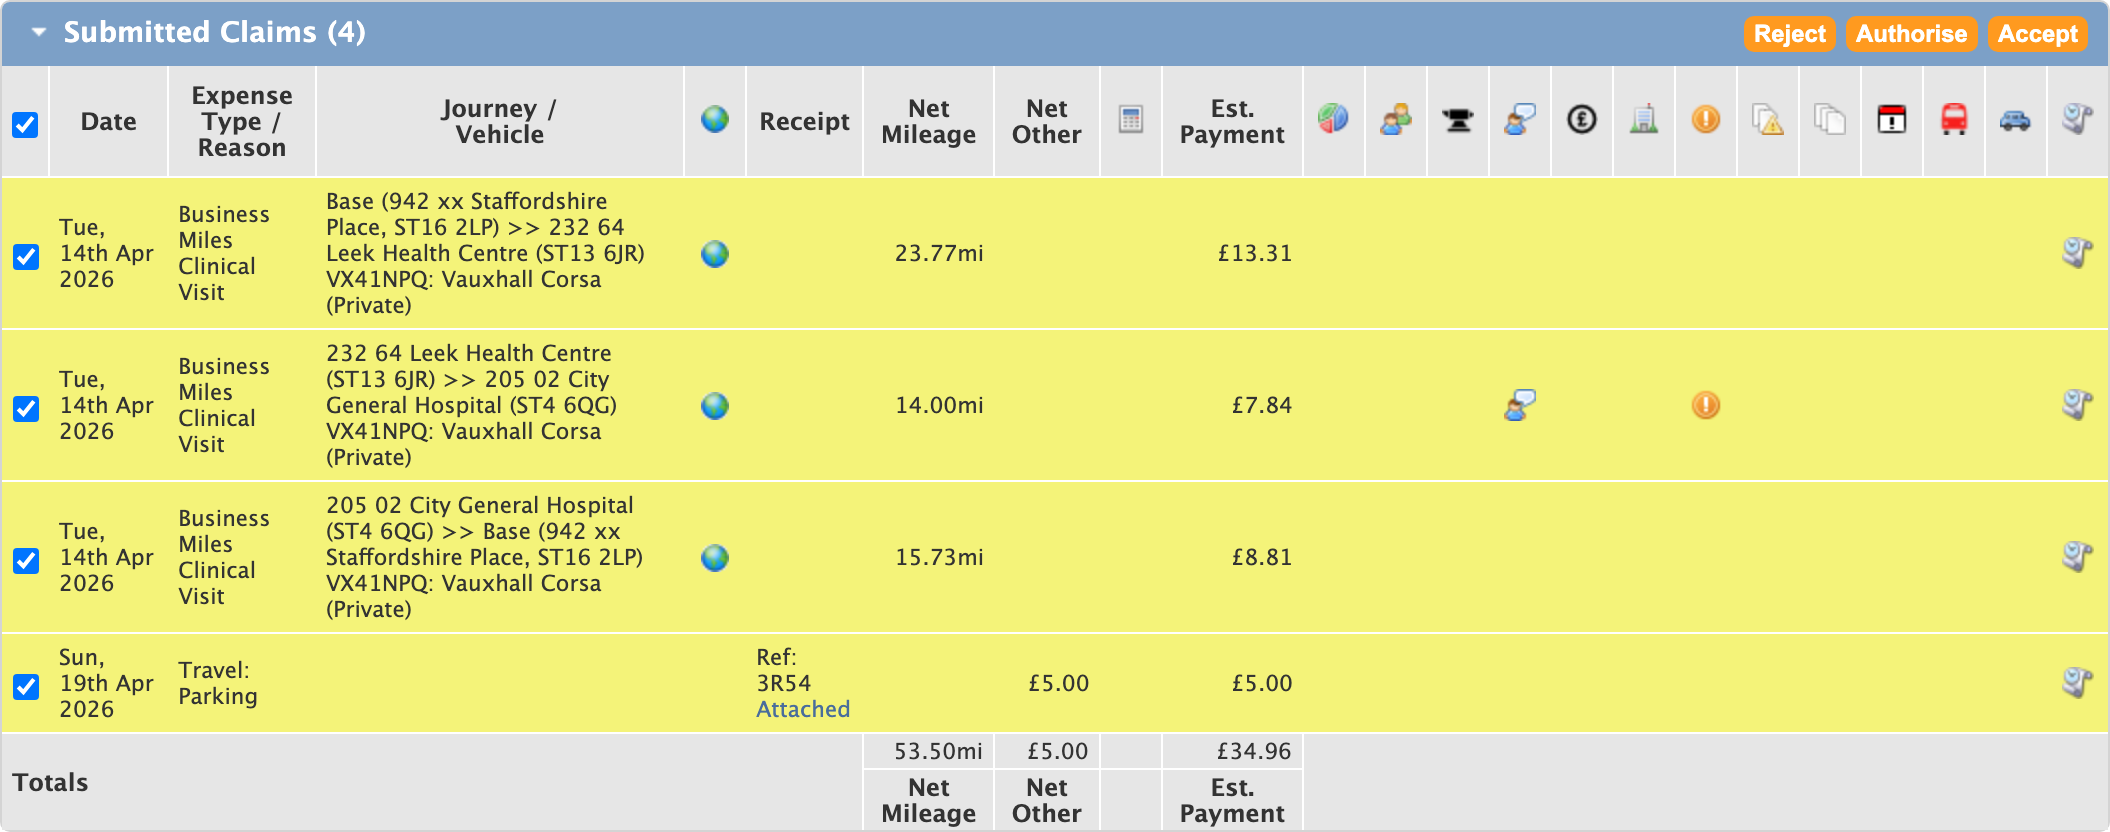
Click on the button at the top right-hand side of the Submitted Claims section to accept the items that are marked with a tick. Depending on how your EASY system is configured the system will require you to confirm your authorisation by either entering the appropriate characters from your security word, entering your PIN, or entering a one time passcode either from an authenticator app, email or SMS.
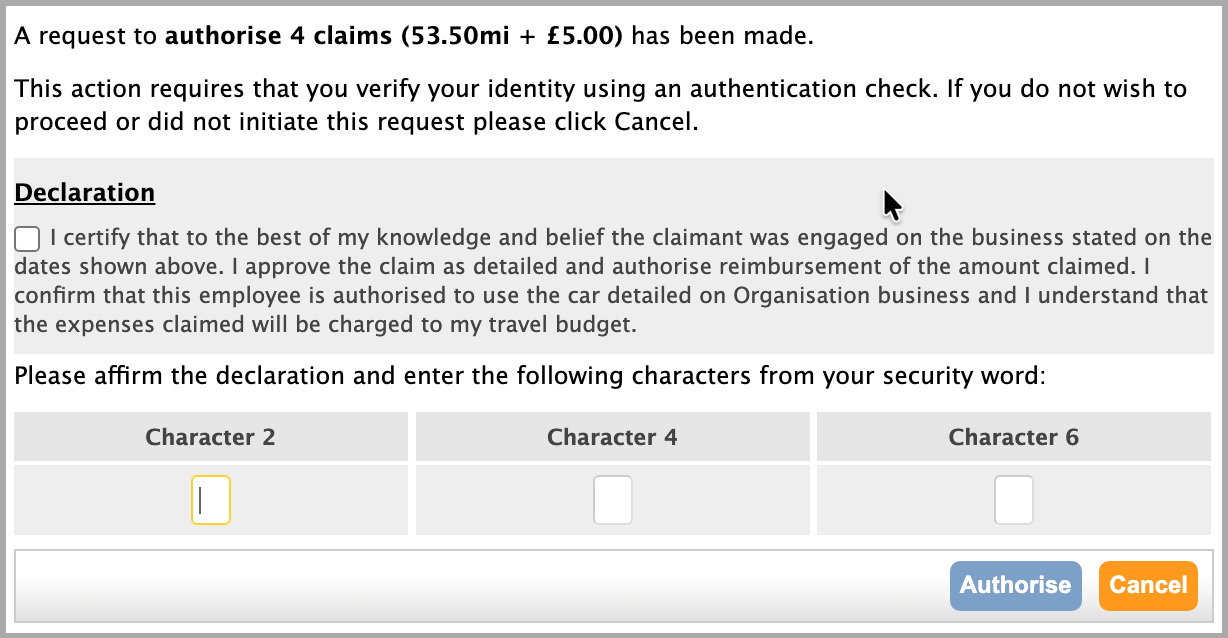
When you click on the button a confirmation message similar to the one below will appear at the top of the screen.

The Submitted Claims table will be updated with the number of claims remaining to be authorised or rejected.
The authorised expense claims will be queue for extraction in the next payment run except where a particular type of expense requires acceptance by the Finance Department.
Rejecting Expense Claims
To reject any items claimed by the employee, you must ensure that the tick box on the left-hand side of each row is ticked, which will highlight the selected row.

Click on the button at the top right-hand side of the Submitted Claims section to reject the items that are marked with a tick. The system will present you with a window in which you can enter the reason why you have rejected the expense claim
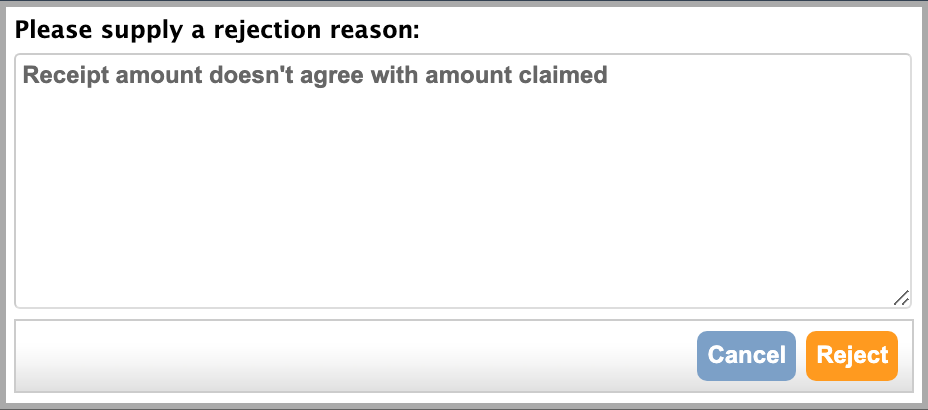
When you select the Reject button an email is sent to the employee.
If there are no more claims outstanding for the employee you will be returned to the Expenses Status screen with the list of employees who have submitted an expense claim.

Accepting Expense Claims
As mentioned earlier, it may be your Trust’s policy that certain types of expense claims will need to be accepted by another person/team before being passed for payment. As a designated Accepter a message may appear in your Reminders menu when an expense claim requires your attention.

The EASY system may also send an email to designated Accepter(s) where the Authority parameter has been set accordingly.
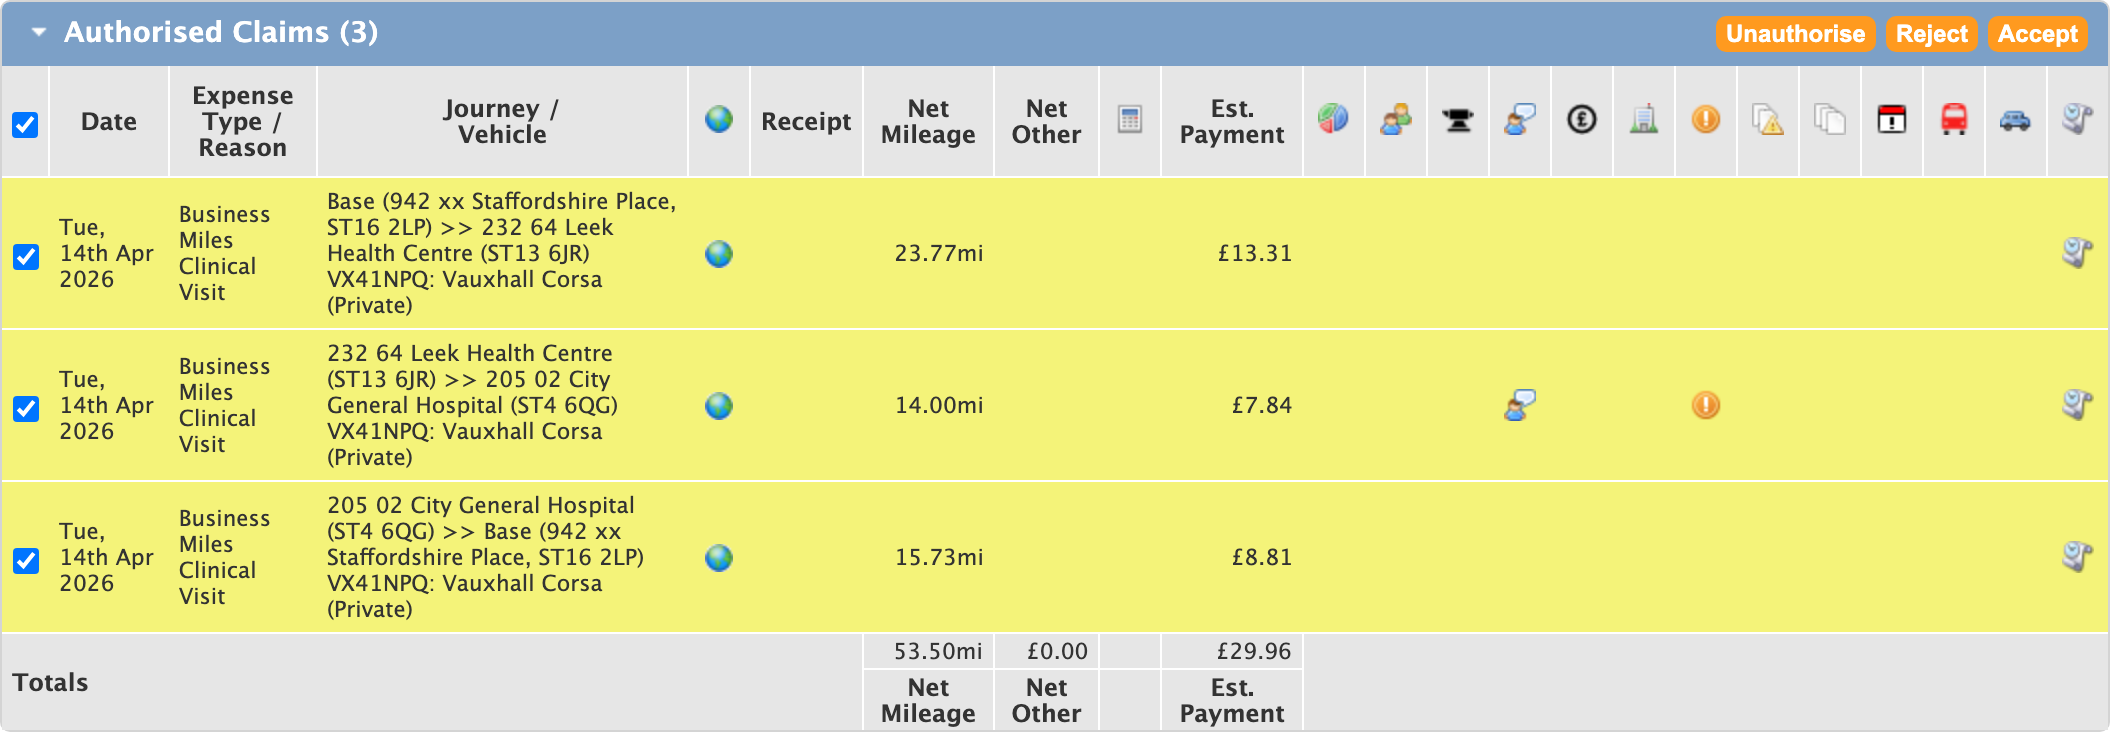
You can view the Expense Status page by selecting the Expenses link in the Navigation menu or by selecting the link in the Reminders menu. The pay groups that have employees whose claims are authorised and require acceptance will be shown in a table similar to the one below.

The Assignment Claims page is displayed when you select the name of the employee whose claim is to be processed.
Click on the button at the top right-hand side of the Authorised Claims section to accept the items that are marked with a tick. Depending on how your EASY system is configured the system will require you to confirm your acceptance by either entering the appropriate characters from your security word, entering your PIN, or entering a one time passcode either from an authenticator app, email or SMS.
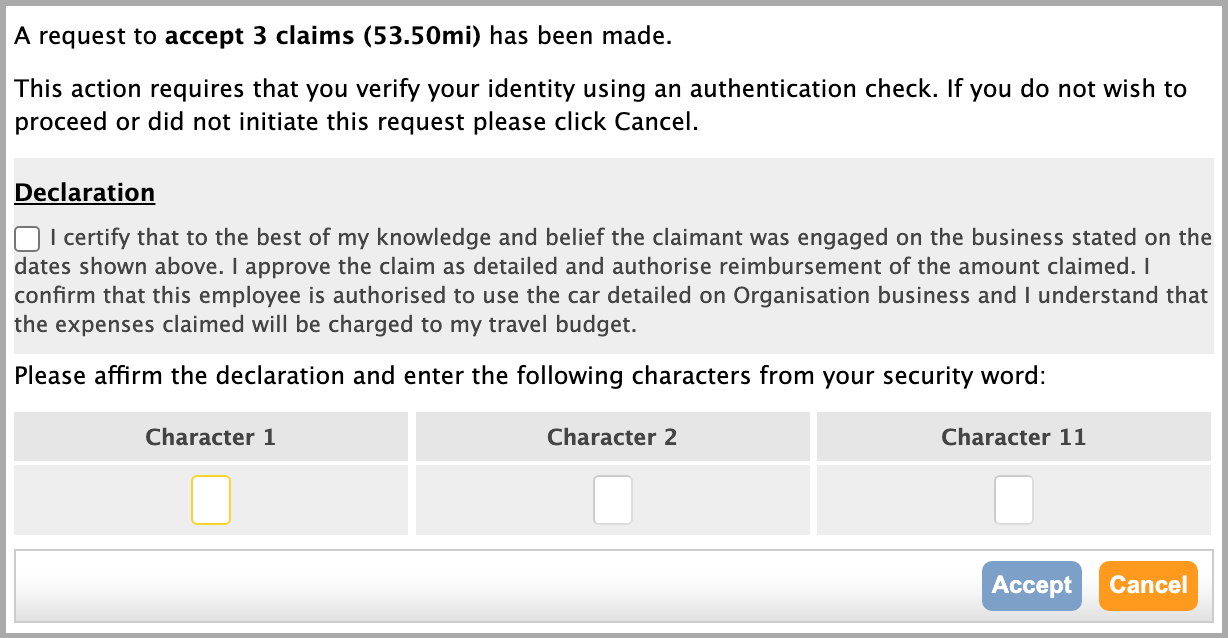
When you select the button a confirmation message similar to the one below will appear at the top of the screen.

Once a claim has been accepted it will be queued ready for extraction in the next payment run.
In the event that an expense claim does not meet the Trust’s acceptance criteria, you may reject those claims marked with a tick by clicking on the button at the top right-hand side of the Authorised Claims table. The procedure for rejecting an expense claim is explained in the section above.